



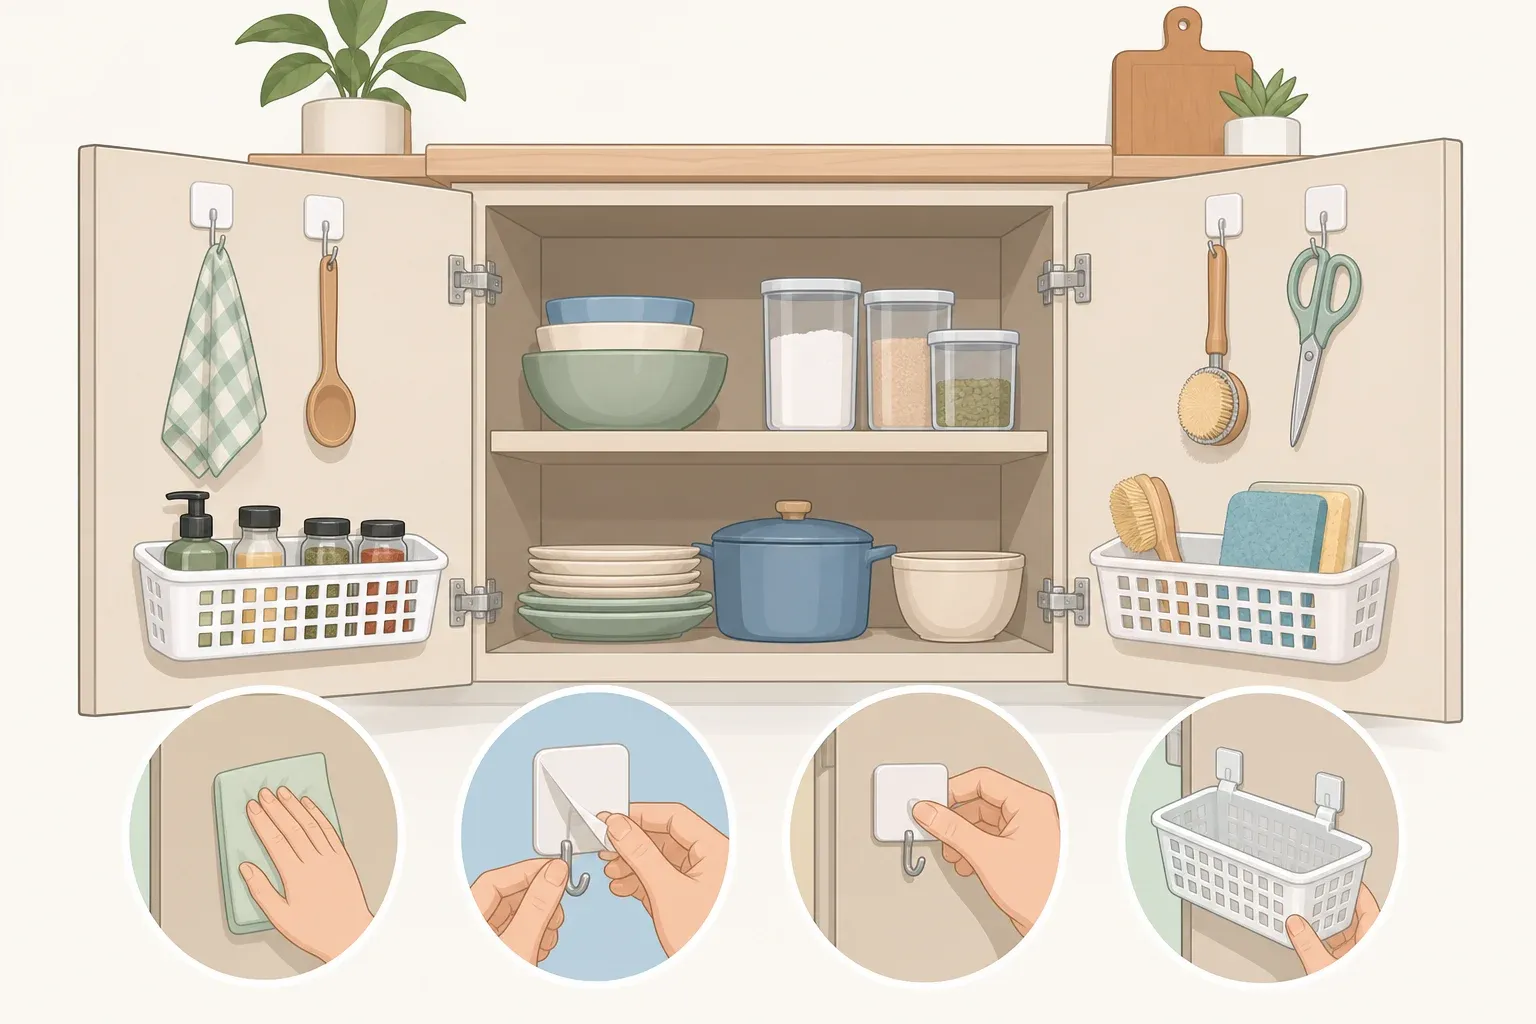
A three-pack of slotted plastic baskets and a pack of mini adhesive hooks, priced at about $1.25 each at Dollar Tree, make up the entire supply list for this Dollar Tree cabinet door storage hack. Apartment Therapy covered the setup, pricing the whole basket-and-hook combo at roughly $2.50 before tax, close to the $3 figure the outlet lands on once tax gets added.
The method works because plenty of cabinet doors have open space behind them, room between the door face and whatever sits on the shelf. The setup works on kitchen, bathroom, or living room cabinets, or really any door with an empty nook behind it. Treat that as a starting condition, not a guarantee: some doors don't have enough clearance, and the only way to know is to check before any adhesive touches the door.
What you'll need
Two products cover this project. Pick up a three-pack of long, slotted rectangular baskets and a pack of mini adhesive hooks, both about $1.25 and both available in-store or online at Dollar Tree. Together, that's the Dollar Tree storage baskets and adhesive hooks combo the whole hack is built around.
Budget around $2.50 before tax for one basket-and-hook setup. If you're outfitting more than one door, multiply from there.
Three-pack of slotted rectangular baskets
Pack of mini adhesive hooks
Tape measure and painter's tape, for the clearance check below
Rubbing alcohol or a mild cleaner, for surface prep
Short screws or a glue rated safe for wood and plastic, only if you want a permanent mount
No tools are required for the basic adhesive-hook version. That makes this a reasonable first project even if you've never mounted anything to a cabinet before.
Measure, dry-fit, and check clearance before you commit
Skipping this step is the most likely way the project fails. There's no specific basket depth or clearance a cabinet door needs, so that part is on you.
Start with a tape measure. Measure the height and width of the door's interior face, then measure the basket itself: length, width, and how far it sticks out once mounted. Compare that depth measurement to the gap between the door and whatever sits on the shelf behind it. If the basket is deeper than that gap, it won't clear when the door closes, no matter how well the hooks hold.
Check the hinge swing next. Hold or tape the empty basket where you plan to mount it, then close the door slowly. Confirm it clears shelf contents, jars, and the hinge hardware itself. A basket that looks fine against a flat door can still catch on a hinge arm the moment the door swings shut, so check that specific spot even when everything else looks clear.
Thinking about mounting all three baskets on one door? Space them out evenly, vertically, to use up otherwise wasted space. Dry-fit all three before peeling any adhesive backing; whether three actually fit depends on your door's height and what's already stored on the shelf behind it, so treat a full three-basket layout as something to test, not something to assume.
Skip adhesive hooks entirely if the door surface is dusty, greasy, peeling, or heavily textured, unless the hook package specifically says it's rated for that kind of surface. Adhesive needs a clean, smooth, dry contact point to hold, and no amount of pressing will fix a surface it wasn't designed for.
Once you've picked a clean spot, prep it the way the hook package instructs, typically wiping the area with rubbing alcohol or a mild cleaner and letting it dry fully. Follow the package's stated wait time before hanging any weight on the hooks. There's no tested adhesive performance across different finishes, so lean on the manufacturer's directions rather than guessing how long the bond needs to set on painted wood, laminate, or textured cabinet surfaces.
Choose your mounting method
Adhesive hooks are the main method here, and for good reason: they come off without damaging the cabinet door. It's renter-friendly for exactly that reason. Move a basket if the first placement doesn't work, and there's no patching or repainting required.
A permanent mount is the other option. You might screw the basket in or use a glue rated safe for wood and plastic for a more secure connection, though either method doesn't guarantee a heavier-duty hold. Before reaching for a drill, check what the door is actually made of. Thin cabinet panels, hollow-core doors, or veneer over particleboard can split or blow out if a screw runs too long or goes in at the wrong angle. If you can't tell what's behind the door face, don't guess; stick with adhesive instead.
If you do use screws, choose ones short enough that they won't punch through the front of the door, and measure the door's actual thickness rather than estimating it. If you use glue, follow that product's own cure time before hanging anything in the basket.
Stick with adhesive if you rent, want the flexibility to reposition baskets, or plan to store only light items. Choose screws or glue only if you own the cabinet, know the door's actual construction, and you're comfortable with a setup you won't easily undo.
How to install a Dollar Tree cabinet door organizer
These steps build your adhesive basket cabinet door organizer from an empty door to a working storage spot in a few minutes.
Thread two hooks through one basket. Poke the edges of two adhesive hooks through the slots on the long side of the basket, spaced roughly equidistant from the center.
Peel the backing off both hooks, but don't press down yet. Line the basket up with the spot you already confirmed during your clearance check.
Press the basket firmly against the inside of the cabinet door. Take only seconds; as a cautious extra step, hold firm pressure for a few seconds so the hooks make full contact before letting go.
Close the door slowly to recheck fit. This confirms what your dry-fit predicted. The basket should clear shelves, hinges, and stored items with the door fully shut.
Load-test before filling. Hang one light item first, like a single travel-size toiletry, then open and close the door several times to confirm the basket holds, and the door still swings freely. Only after that quick test should you load the basket with everything you planned to store, adding items gradually rather than all at once.
Repeat for additional baskets if your dry-fit showed they'll fit, spacing them vertically using the layout you already tested.
Reposition with a fresh hook if needed. If a basket sits too low, too high, or gets in the way of the door closing, peel it off and remount it with a new hook rather than reusing the one already pressed down. The hooks come off without damaging the door, but a hook that's already bonded once isn't guaranteed to hold as well a second time.
What to store, and what to skip
Lightweight, compact items are the best fit: sponges, toothpaste, small toiletries, snack packets, sandwich bags, cleaning cloths. The whole project is customizable to what you're storing, so basket size and placement can match the contents instead of forcing your stuff into a fixed layout. That flexibility is part of what makes this such a cheap kitchen cabinet storage hack: swap what's in the basket as your needs change without buying new hardware.
Skip the heavier stuff. Canned goods, glass bottles, tools, and large bottles of cleaner are a poor match here. Light and compact is the practical ceiling until you've load-tested a specific setup in your own cabinet.
Removable baskets carry a cleaning advantage too. Pull one off, rinse it out, and re-stick it once dry, which matters for anything that gets messy, like sponges or toothpaste tubes.
This isn't limited to kitchen cabinets. The same DIY cabinet door storage with baskets approach works on bathroom, living room, or other doors with empty space behind them. Run the same clearance and surface checks on any door before mounting; a door isn't automatically a good candidate just because it opens and closes.
Finish, troubleshoot, and maintain
Once everything's mounted and loaded, do a final check. Open and close the door several times with the baskets at their intended weight. The door should swing freely without catching on shelves, contents, or hinge hardware, and the baskets should sit flush against the door rather than tilting or pulling away at one edge.
Check back on the hooks after a few days of normal use. If a basket has shifted, sagged, or pulled loose, take it down, clean the surface again, and remount it with a fresh hook rather than the one that failed. If it fails a second time in the same spot, that's a sign the surface or the weight is wrong for adhesive, and it's time to move to screws or glue instead, once you've confirmed the door's construction.
In humid rooms like a bathroom, check the hold periodically rather than assuming it's fine long-term. There's no existing test for adhesive performance in moisture, so a periodic recheck is a good precaution.
Renters should stick with the adhesive-hook version to keep cabinet doors damage-free at move-out. Homeowners who want something more permanent can move to screws or glue once they've confirmed the door's thickness and construction and matched the fastener to it. If a basket isn't working in one spot, move it, swap the hook, or change the mounting method, rather than forcing a setup that keeps failing.















Comments
Be the first, drop a comment!