



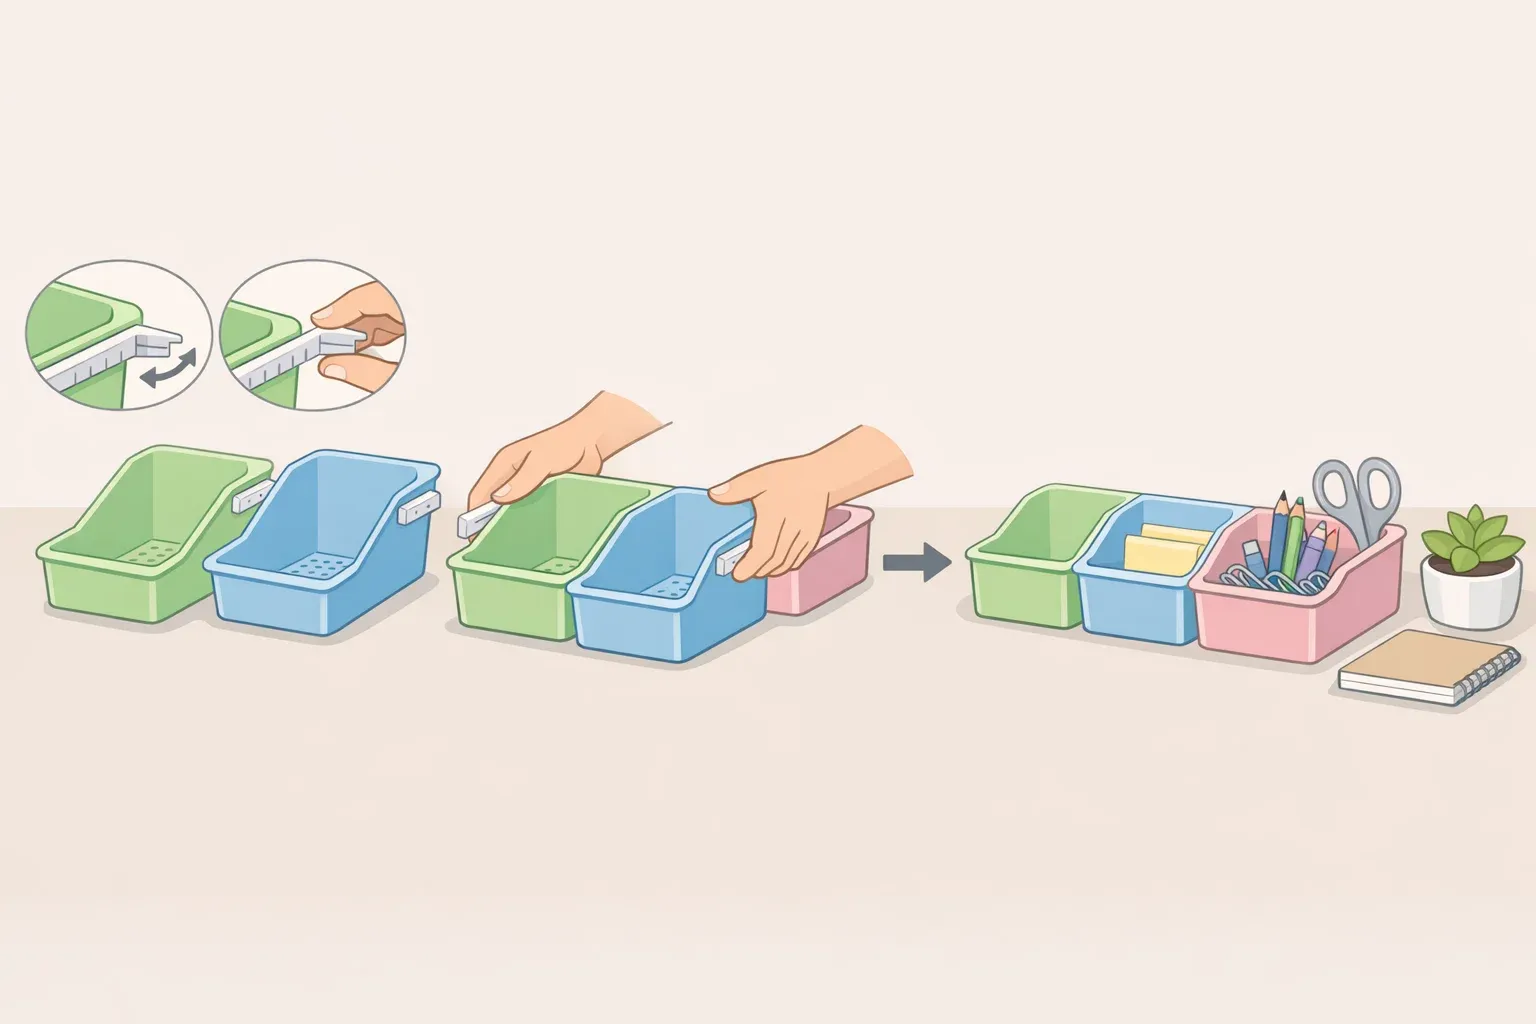
Dollar Tree sells a plastic stocking bin with tracking slides built into its sides, and that rail system is the entire trick behind this project. Slide two of these bins together, and they lock into place, side by side or stacked, with no glue and no tools involved, according to a demonstration posted earlier this summer.
This guide covers how to build a Dollar Tree DIY desk organizer using that rail design, plus a separate wood housing you can build around the bins later if you want a furniture look instead of visible plastic. The basic organizer is the main project here. It's a short sequence: remove labels, slide bins together, done. The cabinet is a bigger undertaking, meant for a different day, with its own tools and materials.
Before you buy a full set of bins, confirm you're looking at the right product. Check that the bins match the stocking-bin style shown in the linked demonstration and that you can see the side slides on the packaging or the shelf display. If your store lets you compare two units before checkout, connect them and confirm the lock before buying more; if not, check the packaging and your store's return policy in case the fit isn't right.
A related project used a different item its source calls acrylic stackable drawers to build a picture-frame organizer, and nothing confirms that's the same product as the tracking-rail bins used here, so don't assume the material or shape until you've checked in person.
On cost, this guide won't give you a fixed total. The only required purchase for the basic build is the bins, and how many you need depends on your storage and your local store's shelf price, so treat any specific total you see elsewhere for this project as unconfirmed.
What you'll need: basic organizer vs. optional cabinet upgrade
If you're after budget desk organization ideas, this is about as low-commitment as one gets: the only purchase is the bins, and the only tool required is your hands. The reference build used six bins, but add or drop bins to match what you're organizing.
The same organizer works as a Dollar Tree office organizer for pens and sticky notes, or as a place to sort craft supplies; those are just possible uses, not something the source tested. What the demonstration doesn't cover is weight capacity. It shows the bins in use but never tests load limits, so stick to small, lightweight items and don't stack a tall tower and expect it to hold anything heavier.
The optional wood cabinet is a different scope entirely. In the demonstration, the creator used two Dollar Tree mini pallets, Dollar Tree wall shelves, Dollar Tree scrap wood, spray paint, wood glue, superglue, hot glue, painter's tape, and small nails. You'll also need a saw capable of cutting wood to size; the source used a mini table saw. Treat this as intermediate DIY and plan on more than one sitting, since the wood glue and paint both need time to set before you can move to the next step.
Quick comparison to help you decide which one to build:
Basic organizer Materials: bins only. Tools: none. Reversible: fully, rearrange or remove bins anytime.
Cabinet upgrade Materials: bins plus wood, paint, and adhesives. Tools: saw. Reversible: partial, depending on the hot-glue decision covered below. Time: multiple sessions, with dry and cure time built in between them.
If you move on to the cabinet, settle safety before you touch a saw. Wear eye and hearing protection, keep your hands clear of the blade path, and follow your saw's manual for blade guard placement. If you don't have a safe way to make these cuts, don't force it; find someone experienced to help, or skip the cabinet and stick with the basic build. Spray paint outdoors or in a well-ventilated space, per the paint can's label, and don't spray indoors.
How to assemble a Dollar Tree DIY desk organizer
Here's how to make a Dollar Tree desk organizer without glue or tools, in six steps.
Plan your layout before you touch a bin. Measure the desk surface where the organizer will live and decide whether side-by-side or stacked makes better use of the space. A wide, shallow desk usually suits a row; a narrow, deep one usually suits a stack.
Remove the manufacturer labels from each bin.
Slide the bins together using their tracking rails, arranging them side by side, stacked, or both, based on the layout from step one.
Add or remove bins to match what you're storing. The creator says you can add as many bins as needed depending on the size or storage you're going for.
Pull each drawer fully out and back in. It should glide smoothly on the rail. If one catches or drags, reseat it before loading anything inside.
Set the finished stack on the desk itself and check it against your plan: does it sit flat without rocking, and does it block anything you reach for often?
A successful build looks like this: every drawer opens and closes without shifting the rest of the stack, the base sits flat on the desk, and the whole thing stays clear of your keyboard, monitor, or whatever else lives on that surface. This organizer needs nothing else to function. If it meets your storage needs, there's no reason to go further.
Optional upgrade: lanning and building a wood housing around your bins
This is a separate project for anyone who wants a furniture-look cabinet instead of visible plastic. Building it in means giving up some of the basic version's flexibility, especially if you hot glue the bins in place later, so weigh that before you start cutting wood.
How the housing is laid out
The reference cabinet stacks four wood pieces: a base platform, two vertical side boards, and two shelf pieces cut from Dollar Tree wall shelves. The base is made from two mini pallets glued into one piece, sized to hold three bins side by side.
The creator marked one shelf about 5 inches up from the base and another about 9 1/2 inches up, working with six bins total, but the demonstration doesn't spell out exactly how bins distribute across those two shelf marks. Don't treat those numbers as a guaranteed six-bin, two-tier blueprint. There's no back panel; the base, sides, and shelves are what hold the shape together.
Sketch your own layout against your actual bins and shelf pieces before buying any wood, using the source's measurements only as a proportion example, not a spec to copy.
Measure before you cut
Two measurements matter here, and they aren't interchangeable. For vertical spacing between shelves, start with your bin's closed height, then test-fit with a little slack so the drawer isn't rubbing against the shelf above; the goal is a drawer that opens freely, not a fixed clearance number.
For front clearance, pull the bin's drawer all the way open and measure how far it extends forward from the closed position; that tells you how much open space you need in front of the cabinet, not how tall to make each tier.
Check both on your actual bin before marking any cuts. The reference build's 5-inch and 9 1/2-inch shelf marks are useful only as a proportion example, since bin dimensions and store stock can vary by location.
Dry-fit, glue, then dry-fit again
Footprint check: set the two mini pallets side by side, unglued, and place three bins on top. Confirm the width works and each drawer opens fully. This is your template, not your finished base yet.
Glue the pallets together to form one solid platform, using painter's tape to hold them while the wood glue sets. Check your glue's label for clamp and cure time before moving on.
Cut the side boards to size. Use the assembled base as your template, tracing its outline onto the wood before cutting, the same approach the creator used with the mini pallets.
Mark your shelf heights on the side boards using the spacing method above, then double-check by pulling a bin's drawer fully open at the marked spot. If it catches, move the mark before cutting anything.
Cut the shelves to size, trimming them down if the scrap wood runs wider than needed, the way the reference build trimmed its own wall-shelf pieces.
Second dry fit: stand the base and side boards together with the shelves resting at their marked heights, no glue yet. Insert every bin and pull each drawer fully open one at a time. Adjust now if anything catches, before glue makes the mistake permanent.
Glue, reinforce, and finish
Glue the shelves to the side boards at your marked heights, using painter's tape to hold them while the glue sets.
Once that glue sets, add small nails at each shelf joint for extra hold.
Glue the base to the side boards. If your pallet wood is thin, skip nailing that joint; the reference build relied on glue alone there because the wood was too thin to nail.
Let every glued joint cure fully before handling the structure, and check your own wood glue's label for the exact time, since it varies by brand. A separate Dollar Tree wood-shelf project from a few years back left its joints overnight before handling, but that build used E6000 on bamboo cutting boards, not wood glue on pine, so it isn't a reliable stand-in for your cure time.
Lightly sand the assembled housing, then spray paint it, following the same approach the reference build used on its own drawers. Test the paint on a hidden spot first, like the inside back of a bin, and follow the can's label for dry time and surface compatibility. Wood glue needs to cure fully before handling, and spray paint has separate dry-to-touch and full-cure windows; check both product labels rather than guessing.
Slide the bins into the finished housing.
One optional step is worth thinking through before doing it: hot gluing the bins to the housing at the back for extra stability. Hot glue keeps the bins from shifting, but it also makes removing them for cleaning or rearranging much harder afterward. Skip it if you'd rather keep that flexibility.
For a finishing touch, the reference build added metal label holders and scrapbook-paper drawer liners for a vintage apothecary look. Both are purely decorative, and the housing works fine without them.
Troubleshooting: fixing common build problems
Bins won't lock together on the basic build: first check whether labels or sticker residue are still stuck to the rail edges, and wipe them clean before trying again.
A drawer drags after the housing is painted: if paint is rubbing against the drawer, stop and inspect the contact point before sanding anything. Light sanding on that edge, plus more thorough masking on future coats, is a reasonable next step once you've confirmed buildup is the cause.
A shelf blocks a drawer from opening fully: this usually means the second dry fit got skipped or a measurement was off. Remove the shelf, remeasure against the bin with its drawer fully extended, and reglue before continuing.
The housing doesn't sit flat once assembled: recheck the base and side board joints for gaps first. One possible cause is a joint that shifted while the glue was setting, and it's easier to fix by regluing that joint than by shimming the finished piece.
Finishing up
The basic organizer is done once every drawer slides freely, the base sits flat on your desk, and your bin count matches what you're storing, with no tools, glue, or paint involved.
If you built the cabinet, run one last check before loading it up: set it on the surface where it will actually live, then pull each drawer fully open one at a time. Stop and reinforce a joint if the structure lifts, rocks, or shifts at any point during that test. Once it passes, load your bins and put it to work; if you hot-glued them in place, plan your layout now, since swapping bins around later means breaking that bond.














Comments
Be the first, drop a comment!