



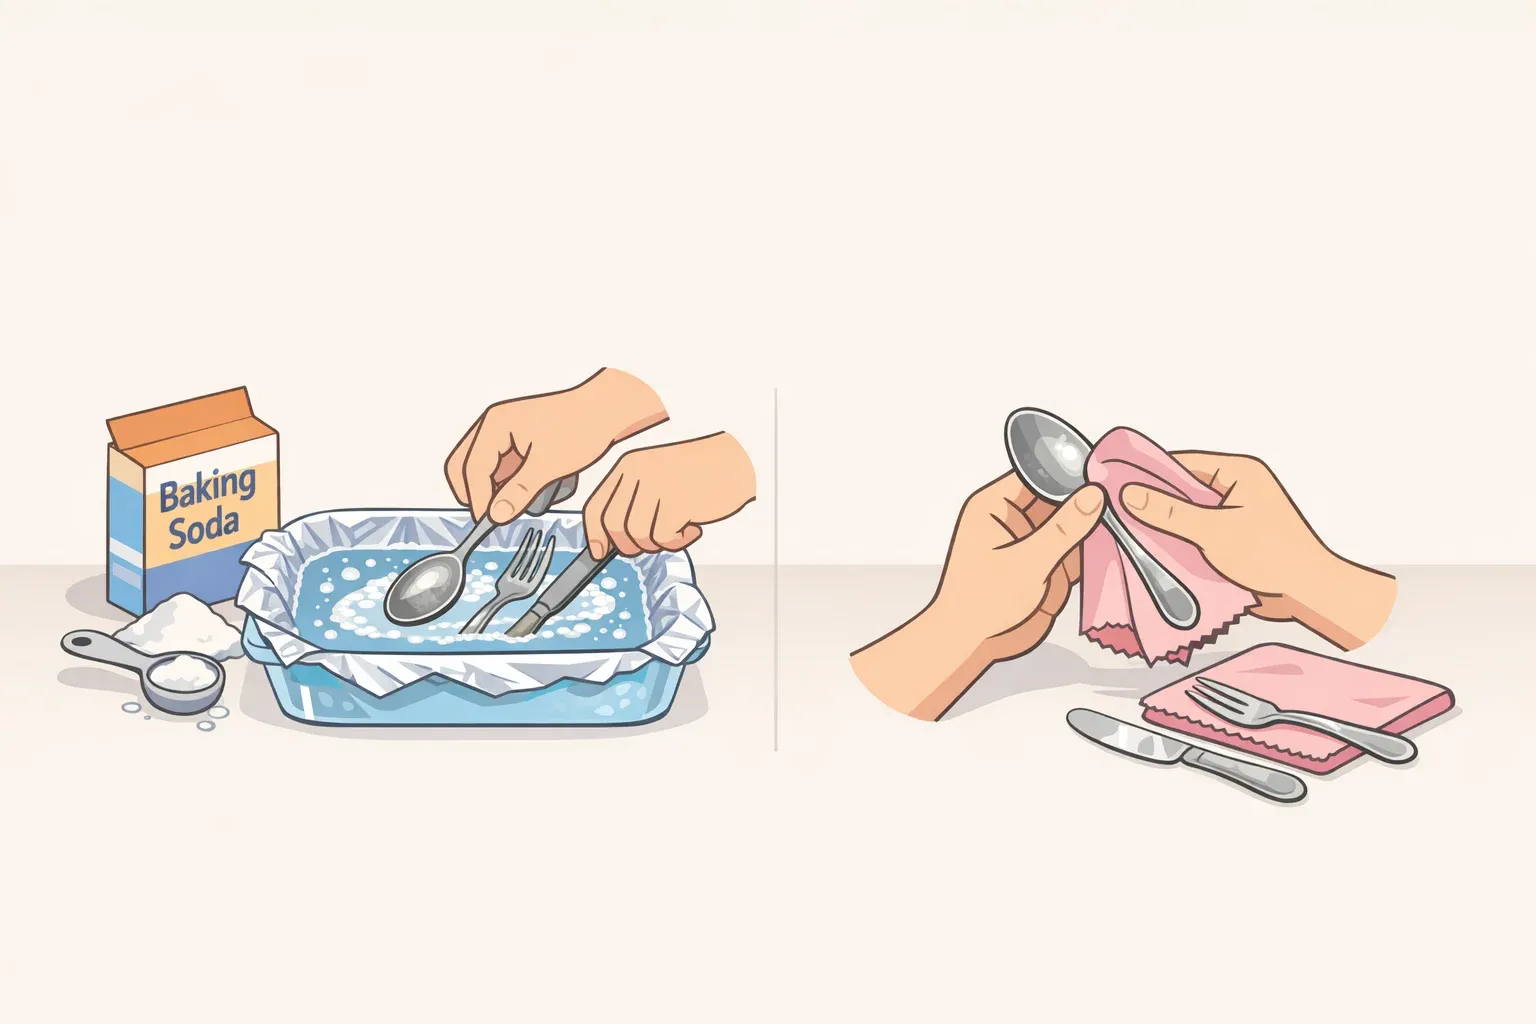
Tarnish is a chemical reaction, not dirt. When silver meets airborne sulfur compounds, it forms a dark layer of silver sulfide on the surface, and that layer is corrosion, not grime you can wipe away. Not every method for how to clean tarnished silver treats that layer the same way, though. Abrasive polishing, whether it's a cloth, cream, or paste, physically removes microscopic layers of silver along with the tarnish.
A foil-and-baking-soda bath works differently, using a chemical reaction to pull sulfur off the silver and onto the foil instead of scrubbing it away. Match the method to what the piece is made of and how tarnished it is, not to whichever method sounds easiest.
Use this decision path before choosing a method. Plain modern sterling with light tarnish gets mild soap and water, then a polishing cloth if needed. Plain sterling with moderate, even tarnish can go into the cloth or the foil bath, as long as it has no stones, plating, or fine detail. Heavy or uneven tarnish, silver plate, vermeil, antiques, gemstones, or visible damage means skipping DIY and going to a jeweler or conservator.
DIY-friendly: identified plain modern sterling, no stones, plating, glue, intentional oxidation, or fine detail, with light-to-moderate, even tarnish.
Damp cloth only, never soaked: plated, vermeil, gemstone-set, hollow, filled, glued, enameled, or deliberately oxidized pieces.
Stop and get help: unknown construction, structural damage, uneven black staining, a pale or blotchy finish, or a piece with real sentimental or resale value.
This guide focuses on plain, solid modern sterling jewelry and flatware, the category that's most straightforward for a beginner working with basic supplies. Everything else, including plate, vermeil, antiques, hollowware, weighted pieces, and gemstone settings, gets a short list of what not to do instead, since those categories carry risks the core method doesn't cover.
Confirm what you're actually looking at
Before cleaning anything, tell tarnish apart from three things it's often confused with.
Tarnish looks like a gold-to-charcoal haze or uneven discoloration, and it comes off with the methods below on eligible pieces.
Ordinary dirt or residue, like fingerprints, food oils, or waxy buildup, often lifts with plain soap and water alone, before any tarnish-specific step is needed.
Patina on antiques refers to the dark recesses in engraved or chased decoration, and collectors generally treat it as intentional. On French hollowware or heavily ornamented flatware, that tonal contrast gives the design its depth, and polishing it uniformly bright can flatten what the silversmith meant to preserve.
Structural or coating problems are a different matter. Sticky residue, white or green spots, loose handles, a damaged foot, or uneven black staining can signal prior repairs, lacquer failure, or moisture damage, and any of those call for stopping before polish touches the piece.
Check for a "925" or sterling hallmark before you start, but treat it as confirmation of the metal's fineness, not proof of the piece's full construction. Decorative silver can carry plating, lacquer, or selective gold detailing that isn't obvious at a glance, so test any new-to-you piece on a hidden spot first, such as the underside of a foot or the back of a handle. If you can't tell what the piece is made of or how it's built, skip cleaning altogether and ask a jeweler or conservator.
One rule matters more than the rest before any water touches your silver: never immerse or soak hollowware with joints or hinges, weighted candlesticks, filled-handle knives, or anything with glued, enameled, wood, ivory, or pearl components. Water caught at a joint or filled base can cause damage that shows up later. This rule applies to every method in the next two sections.
What you'll need
Difficulty: Beginner-friendly, but only once you've confirmed the piece is plain sterling. Anything else on the checklist above calls for a damp cloth or a professional, not the steps below.
Mild, phosphate-free dish soap
Lukewarm water
Two lint-free cotton cloths, one for washing and one for drying
A silver polishing cloth, if you're using that method
For the optional foil bath: a nonmetallic bowl or basin, aluminum foil, baking soda, very hot water, tongs, and a well-ventilated room
Soap and water take about 2 to 5 minutes of soaking plus drying time. A polishing cloth adds roughly 1 to 3 minutes per piece. If you're looking for how to polish silver at home without buying anything special, soap and water alone may cover light tarnish and everyday residue; save the cloth and foil bath for tarnish that doesn't come off that way.
How to clean tarnished sterling silver with soap and water
Both options below are for solid sterling jewelry or flatware with no stones, plating, or intricate engraving. Pick the one that matches your tarnish level; you don't need to try both.
Soap and water, for light tarnish and everyday oils.
Wipe off loose dust with a dry cotton cloth first. Rubbing a wet cloth or polish over grit is a common cause of fine scratches.
Soak the piece for 2 to 5 minutes in lukewarm water, around 90 to 100°F, with 1 to 2 drops of mild, phosphate-free dish soap per cup.
Rinse and dry immediately and completely with a lint-free cotton cloth. Air-drying leaves water spots that can encourage new tarnish.
Check the surface once it's dry. If it looks even and bright, you're done; no further step needed.
Polishing cloth, for light-to-moderate tarnish that soap didn't fully clear.
Rub gently in straight strokes, focusing only on tarnished areas rather than the whole surface.
Stop once the color returns to an even tone. A polishing cloth is meant for maintenance, not heavy or blackened tarnish.
As the cloth darkens with lifted tarnish, move to a clean section. A spent, dirty cloth can redeposit tarnish and leave a dull film instead of a bright surface.
If tarnish is still heavy, black, or uneven after either option, stop there. Don't scrub harder or soak longer; that level sits outside what soap and a polishing cloth are built for. See Troubleshooting below for what to try instead.
The foil-and-baking-soda bath: an optional chemical method, not an upgrade
This is a separate option, not the next step after soap or cloth. It fits one case only: plain, modern, solid sterling with moderate, even tarnish and no stones, plating, glue, or fine detail.
The bath works through ion exchange. Sulfur atoms bond more readily to aluminum than to silver, so in hot water they let go of the tarnished surface and transfer onto the foil instead, a way to remove tarnish from silver without scrubbing away any metal.
The documented version of this reaction is a university chemistry demonstration that used aluminum foil, sodium carbonate, and very hot water, and required the silver to physically touch the foil to complete the reaction. The baking-soda version published across home-cleaning sites runs on the same underlying chemistry, but that classroom demonstration didn't test baking soda specifically, so treat it as a widely used variation rather than a proven equivalent.
Baking soda is also mildly abrasive if it's rubbed directly against metal, so let the water and foil do the work here, not friction. Given that gap in the research, treat this bath as a limited, occasional option for plain modern sterling only, not a substitute for professional care on anything with age, plating, or fine decoration.
Line a nonmetallic bowl or basin with foil, shiny side up. Dissolve about 1 tablespoon baking soda per cup of very hot water.
Submerge the silver so each piece makes contact with the foil somewhere. That contact is what drives the reaction.
Soak 2 to 5 minutes for light tarnish, up to 10 minutes for moderate tarnish.
Work in a well-ventilated space. The reaction gives off a faint sulfur smell as hydrogen sulfide leaves the silver, which means the tarnish is transferring off the piece and onto the foil as intended, not a sign something's wrong.
Use tongs to lift the silver out, since the water stays very hot, then rinse and dry it immediately with a lint-free cloth.
Success here looks like an even lift in discoloration once you've rinsed and dried the piece, not a mirror shine. This bath struggles with heavy black tarnish and offers no lasting protection against re-tarnishing. If the result still looks dull or uneven, that's a sign the tarnish was heavier than the bath handles, not a reason to keep soaking. Treat it as an occasional option, not a routine one.
Safe silver cleaning methods for plated, antique, and gemstone-set pieces
The soap, cloth, and foil-bath methods above are built for plain modern sterling. These categories need a lighter, more limited touch.
Silver plate: the silver layer can be extremely thin after years of wear, and once it's worn through, ordinary polishing can't restore it. Clean with a barely damp cloth and a trace of mild soap only, dry immediately, and skip routine polishing entirely.
Vermeil (gold over sterling): gold doesn't tarnish and shouldn't be polished, only wiped to remove oils. Abrasive cloths or cream can wear through the gold layer at borders and raised edges, so use the same barely-damp-cloth approach as plate, and stop if you see an uneven tone or a different-colored metal peeking through.
Antiques, hollowware, weighted candlesticks, or glued, enameled, or gemstone-set pieces: damp-cloth cleaning only, never immersion, per the no-soaking rule above. Trapped moisture at a seam or filled base is what causes the damage that shows up later.
Heavily engraved, hallmarked, or crested pieces: these establish identity and can affect value, so don't polish them aggressively trying to make the design look more uniform.
Any of these four categories that need more than a damp cloth to look presentable belong with a jeweler or objects conservator, not a stronger DIY attempt.
Troubleshooting and when to stop
Stop immediately if:
tarnish is heavy, black, or returns unusually quickly after cleaning, which often points to a storage problem rather than a cleaning one
the finish turns pale or blotchy after a cloth or bath
a different-colored metal shows through anywhere on the piece
the item is plated, antique, gemstone-set, or already damaged and needs more than a damp cloth
For heavy, black, or fast-returning tarnish, resist the urge to escalate to a longer soak, harder scrubbing, or a commercial dip. A cream polish made for silver is sometimes recommended as a last resort for plain modern sterling with heavy tarnish, but conservators generally avoid commercial polishes because residue can settle into the metal's pores and some formulas carry abrasives coarse enough to scratch. Treat a cream polish as an occasional, product-tested option rather than a routine step, and test a hidden spot first.
If the finish turns pale or blotchy, or a different-colored metal shows through, don't try to even things out by polishing the rest of the piece to match; that just removes more silver or gold. A short list applies to every piece, no exceptions: never use toothpaste, vinegar or lemon juice, bleach or hydrogen peroxide, steel wool, or a commercial dip left longer than its label states, since all of these are linked to scratching, corrosion, or stripped finishes. Any piece that trips one of the stop conditions above belongs with a jeweler or conservator.
Finish, store, and prevent the repeat cycle
A properly cleaned piece should have an even, soft luster rather than a mirror shine, with engraved detail and hallmarks still reading clearly. That's the sign the tarnish came off without over-polishing, and it's how to make tarnished silver shine without flattening the piece's original detail.
Once it's dry, wipe silver with a soft cloth after wearing or handling it to remove oils before they settle, and keep it away from perfume, lotion, sweat, and swimming or shower water. For storage, wrap pieces in anti-tarnish flannel or acid-free tissue and add a silica gel packet to the container to control moisture.
If the piece sits out in a display cabinet rather than a drawer, an anti-tarnish strip absorbs airborne pollutants for several months, which does more for exposed silver than a moisture packet alone. Keep pieces away from rubber, wool, and newspaper, all of which can trap moisture or release sulfur.
Check silver every few weeks if you wear or use it often, and clean only when tarnish actually shows rather than on a fixed schedule. If a piece is plated, antique, gemstone-set, or already shows signs of damage, stop reaching for a stronger DIY method and take it to a jeweler or objects conservator instead.















Comments
Be the first, drop a comment!