



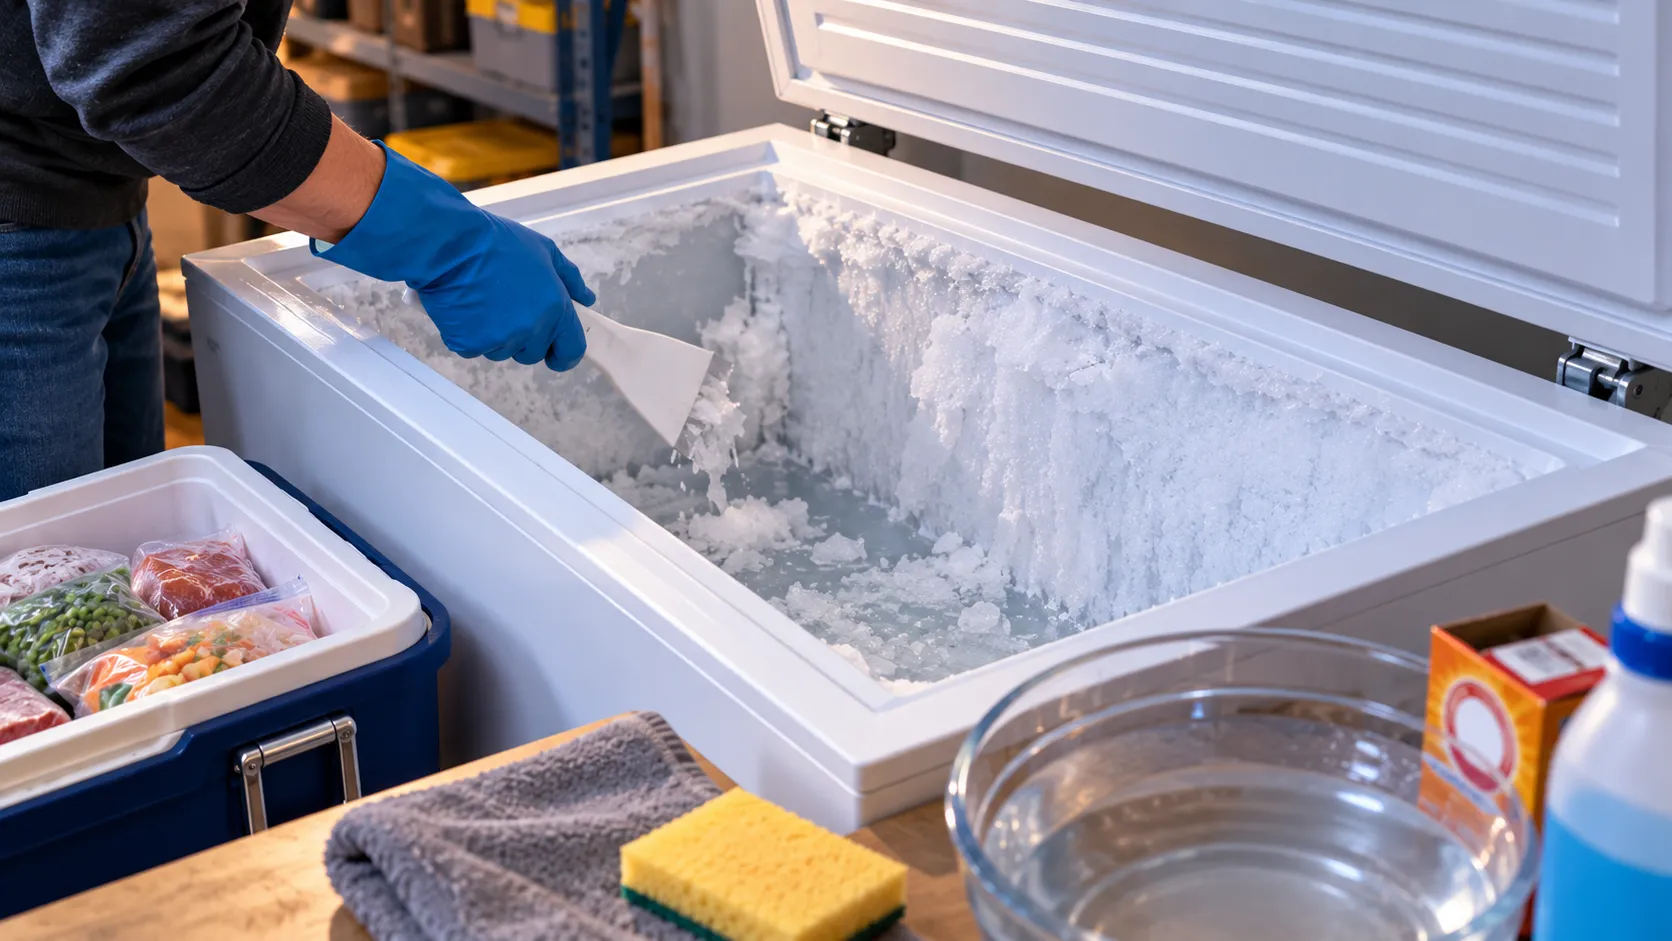
The real trigger for defrosting a chest freezer isn't a date circled on the calendar. It's the frost itself. Whirlpool recommends defrosting and cleaning when wall frost reaches about 1/4 inch thick, while GE's current manual-defrost guidance uses a range of about 1/4 to 1/2 inch.
For a simple rule, use 1/4 inch as the cue to start planning the job. Whirlpool also recommends a complete defrost and cleaning at least once a year, while GE notes that some manual-defrost models typically need it about twice a year in most climates.
This guide covers manual-defrost chest freezers, the standalone units that accumulate frost and need a hands-on defrost cycle. Some chest freezers are frost-free, so check the owner's manual first to confirm which type you have.
The job itself doesn't require wiring or refrigerant work, just some basic supplies and patience. The most important tool rule is simple: never attack freezer frost with a knife, ice pick, screwdriver or another sharp metal object.
How often should you defrost a chest freezer?
Go by frost buildup rather than relying only on a calendar.
Whirlpool recommends defrosting and cleaning once frost reaches about 1/4 inch thick and completing the job at least once a year.
GE's guidance for manual-defrost chest freezers says to defrost when frost reaches roughly 1/4 to 1/2 inch.
Humidity, how often the lid is opened and how well the gasket seals can all affect how quickly frost builds. In humid conditions, Whirlpool says the freezer may need more frequent defrosting.
That makes the frost itself the better signal. Check the walls periodically and plan the job once ice is approaching that 1/4-inch mark.
What you'll need before you start
This is a beginner-friendly job, but it helps to have everything ready before disconnecting power.
Gather:
A plastic or wooden scraper
Mild dish detergent or baking soda
A sponge or soft cloth
Towels
A shallow catch pan, ideally with a second pan ready
A cooler, insulated bags or another freezer for the food
The freezer's owner's manual
A few prep steps make the process easier:
Pick a day when the freezer isn't packed full.
Move food directly into another freezer or an insulated cooler with enough ice or cold packs to keep it cold.
If your manual recommends it, turn the freezer to its coldest setting several hours beforehand. Whirlpool's current instructions specify about six hours for applicable models.
Find the drain before unplugging the freezer so you know where the water will go.
Don't rely on a general claim that frozen food will remain safe for a certain number of hours once removed.
USDA guidance says frozen food can be safely refrozen if it still contains ice crystals or remains at 40°F or below. Perishable food that has been above 40°F for more than two hours should be discarded.
What changes by model
Manufacturers don't use exactly the same defrosting procedure, so the owner's manual for your freezer takes priority.
A few differences are worth checking before you start.
Thermostat before unplugging: GE's manual-defrost instructions tell owners to move the temperature control to OFF before unplugging the freezer. Some Whirlpool instructions move directly to disconnecting power, while other models also have an OFF or zero setting.
Drain setup: Some freezers have an interior drain plug plus an exterior drain or hose connection. Others use a different drain arrangement. Check where yours empties before the ice starts melting.
Approved ways to speed defrosting: Hot water is commonly allowed, but fan use and lid position vary between manuals.
Restart procedure: Follow the model's instructions for restoring power, resetting the thermostat and returning food. Don't invent a long empty cooldown period unless the manual actually calls for one.
If the manual and a general online guide disagree, follow the manual for the exact model.
How to defrost and clean a chest freezer safely
Turn the freezer off if your model has an OFF setting, then unplug it or disconnect power. Remove the food and keep it frozen in another freezer or properly chilled in insulated containers.
Set up the drain. Remove the plugs or caps described in the owner's manual and position a shallow pan, hose or other approved container to catch the water. Check it frequently so it doesn't overflow.
Leave the lid open unless your manual specifies another method. Natural room-temperature air will begin loosening the frost.
Use only defrosting shortcuts approved for your model. Whirlpool's current general instructions allow a bowl of hot water inside the freezer and say the lid can be closed to use the steam. Other Whirlpool manuals and GE instructions describe pans of hot water with the lid open. Some models also permit directing air from an electric fan into the freezer, but the fan itself should never be placed inside.
GE's FCM9SRWW manual specifies hot tap water below 120°F and warns against boiling water.
Do not use a hair dryer, space heater or other improvised electrical appliance unless the manufacturer specifically says it is safe. Whirlpool explicitly warns against using those devices.
Never use a knife, ice pick or other sharp or pointed tool to chip away frost. Use a plastic or wooden scraper only.
Chest freezers can have refrigerant tubing behind the liner. GE warns that a sharp tool can puncture the liner and reach tubing containing flammable refrigerant.
If the liner is punctured or you suspect refrigerant tubing has been damaged, stop using the freezer and contact the manufacturer or a qualified appliance service technician.
Remove large pieces of ice only after they loosen. Don't force sections that remain firmly attached. More time or another manufacturer-approved application of warm water is safer than extra pressure.
Wipe up the remaining water. Once the frost has completely melted, use towels or a sponge to dry the bottom and walls before cleaning.
How to clean the inside of a chest freezer
Wash the interior using the cleaner recommended for your model.
GE's FCM9SRWW manual calls for warm water mixed with about 1 tablespoon of baking soda per quart of water.
Some Whirlpool chest-freezer manuals use a stronger mixture of 2 tablespoons of baking soda per quart of warm water. Whirlpool's current general instructions also allow mild detergent in warm water.
Use the ratio in your own manual where one is specified.
Wash the interior walls, lid liner and gasket with a soft sponge or cloth. Avoid scouring pads and abrasive cleaning powders.
Don't automatically use bleach either. GE and Whirlpool manuals for many chest freezers warn against bleach or bleach-containing cleaners on certain surfaces and plastic components.
Hand-wash removable parts unless the manual specifically says they're dishwasher-safe. GE's FCM9SRWW manual says its removable freezer parts should not go in the dishwasher.
Rinse cleaned surfaces as directed and wipe everything thoroughly dry.
Replace every drain plug and cap securely before restoring normal operation.
When to put the food back
Follow the restart instructions for the exact freezer rather than waiting for an arbitrary number of hours.
GE's general manual-defrost procedure says to replace the drain plug, reconnect power, return the temperature control to its normal setting and return the food to the freezer.
Whirlpool procedures vary somewhat by model, so check the manual.
The bigger safety concern is the food you've removed. Keep it frozen or at 40°F or below throughout the job.
If an item partially thaws but still contains ice crystals or remains at 40°F or below, USDA says it can generally be safely refrozen, although quality may decline.
If perishable food has been above 40°F for more than two hours, discard it rather than putting it back in the freezer.
Once everything is reloaded, keep the lid closed as much as possible while the freezer returns to its normal operating temperature.
If your model has a temperature alarm, check its manual. Some Whirlpool models instruct owners to disable the alarm for 24 hours after defrosting to prevent nuisance alarms while the freezer recovers.
When to stop and call for service
Most defrosting problems don't require a technician, but a few do.
You puncture the liner or may have damaged refrigerant tubing. Stop using the appliance and contact the manufacturer or qualified service technician.
Frost comes back unusually quickly. Make sure nothing is preventing the lid from closing and check the gasket for a poor seal. Frequent lid opening and humid air can also accelerate frost buildup.
The freezer doesn't cool normally after the restart. Verify that the thermostat has been returned to its normal setting and that power is restored. If the freezer still fails to cool as the manual specifies, contact service rather than repeating the defrost.
The drain is damaged or leaking after reassembly. Stop and correct the drain or plug problem before allowing water to reach the floor or electrical components.
Before you finish
Check four things before calling the job done:
The drain plugs and caps are back in place.
The interior and gasket are clean and dry.
The freezer is powered on and set to its normal temperature.
The food has remained safely frozen or at 40°F or below.
One optional odor-control trick comes from GE's FCM9SRWW manual: keep an open box of baking soda inside the freezer and replace it about every three months.
That can help absorb stale freezer odors. It doesn't reduce frost buildup or extend the time between defrosting, so keep watching the walls. When frost starts approaching 1/4 inch again, it's time for the next round.














Comments
Be the first, drop a comment!