



Car clutter isn't a housekeeping problem. It's a documented injury risk, and knowing how to keep your car clutter-free on road trips is one of the most practical things you can do before pulling out of the driveway this summer.
At 55 mph, a 20-pound object in the cabin can strike with roughly 1,000 pounds of force, per safety research cited by Motor1. A one-pound tablet in a 30 mph crash generates enough force to cause serious injury, AAA details. As AAA auto safety expert William Van Tassel puts it, passengers aren't the only things that need to be restrained in a collision; objects do too.
The goal of the system below isn't a spotless interior. It's a cabin where nothing can become a projectile, block a sightline, or slide under a pedal. These steps work for any driver in a standard passenger car, SUV, or minivan. A few reference trunk storage and roof racks; if you're in a pickup or cargo van, the loading logic still applies, but the specifics will differ.
A note on storage accessories: Headrest-mounted trays and multi-function storage hubs get heavy marketing for road trips. A widely shared organizer in this category drew criticism from commenters who pointed out it could obstruct rear sightlines during lane changes. One user wrote, "Am I clear to merge? I can't see," while others asked questions about airbag deployment that went unanswered, per Motor1. The organizer in question held a maximum of 1.65 pounds despite appearing to offer significant storage. That tension runs through the whole category: more storage solutions don't automatically mean more safety. The steps below favor habits and positioning over gadgets.
How to keep your car clutter-free on road trips before you leave the driveway
This phase sets the baseline. A trip that starts organized is far easier to maintain than one that starts cluttered.
Step 1: Apply the two-week rule to clear the car.
Walk around the car and remove anything not used in the last 14 days. AAA recommends this as the primary decluttering filter. Pull out seasonal gear, tire chains, off-season sports equipment, and old gym bags unless it has a specific purpose on this trip. Remove anything valuable, flammable, or private: pricey electronics, butane lighters, and original insurance documents don't belong in an unattended car.
Photograph your registration and insurance card so every driver has a copy on their phone, and leave the originals at home in a safe. Wallet copies work as a backup too.
What you should see: Clear seats, an unburied floor, and a trunk that isn't already half-occupied by things that aren't going on this trip.
Step 2: Assign every item a zone before loading anything new.
The most effective clutter-control habit is fixed locations decided before departure. AAA outlines the model: center console for small, frequently used items, seatback pocket for passenger-side items, trunk for anything heavy. Road Safety Education specifically recommends seat pockets and door consoles for phones, books, and small electronics, not because it's tidy, but because contained items are less likely to become cabin projectiles in a crash.
Zone breakdown:
Center console/door pockets: Phone, charger, sunglasses, driver's snacks, lip balm. Small items that can slide under pedals if left loose on the seat.
Seatback pockets: Tablets, activity books, earbuds, reusable bags, small toys for rear passengers.
Trunk: Everything heavy and bulky. Nothing loose that can travel forward.
Dashboard: Nothing. AAA is explicit that objects on the dashboard are both a distraction and a hazard when the car is moving.
Gotcha: If passengers don't know where things go, they'll create piles. A 60-second walk-through of the zone system before departure prevents an hour of mid-trip reorganization.
Step 3: Pack the trunk strategically, with heavy items low and forward.
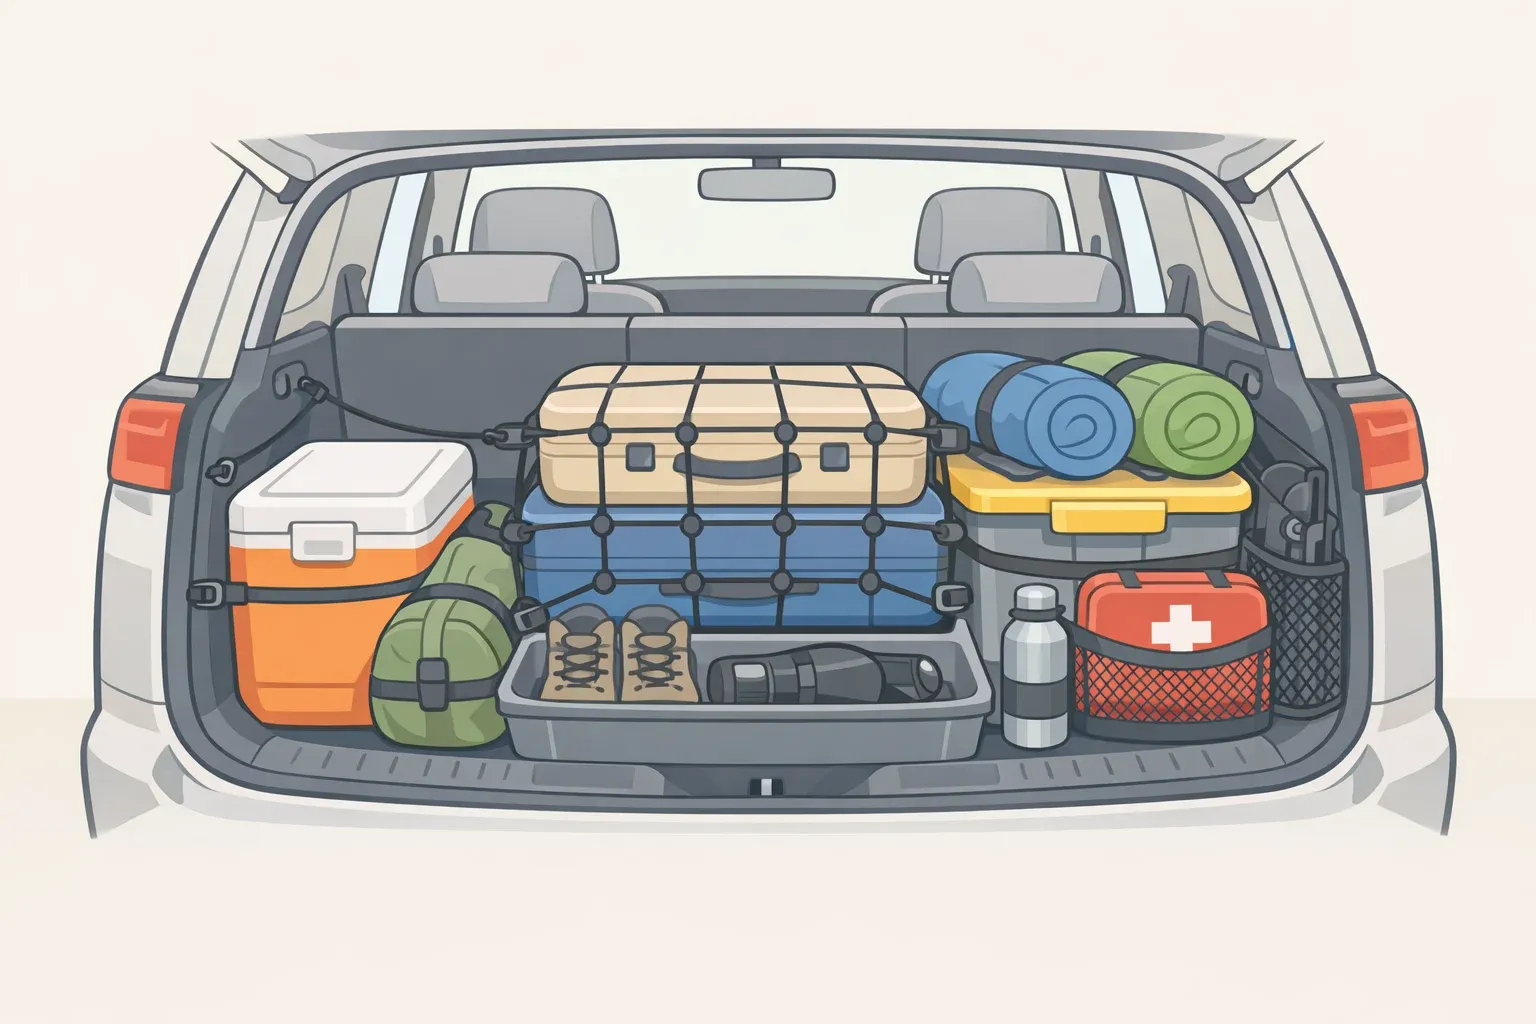
The trunk is where most road trip packing decisions get made wrong. Road Safety Education recommends placing large, heavy items, coolers, main luggage, and sports bags at the bottom of the trunk and as far forward as possible to keep the car's center of gravity low. Lighter, softer bags go on top. Tuck small loose items inside sealable bins rather than letting them roll freely; AAA recommends this approach for emergency kit items like a first-aid kit, flashlight, and jumper cables.
Nothing should be stacked above the rear seatback line. Road Safety Education identifies this as one of the most common dangerous parking errors; it simultaneously obscures the driver's rear view and increases injury risk to rear passengers if the vehicle is struck from behind. If the trunk is full and you need cabin overflow, use the space beneath passenger seats, not on top of them, per Road Safety Education.
If using a roof rack, awkwardly shaped or oversized gear belongs up top, but heavy items do not. Roof storage raises drag, vehicle height, and weight. Measure your loaded roof height before departure and stick a note on the dashboard. Road Safety Education specifically recommends a sticky note there as a reminder for low overpasses and parking structures. Check your vehicle's weight limit in the owner's manual or on the VIN plate and adjust tire pressure to the manufacturer's recommendation for heavier loads before you pull out of the driveway, per Road Safety Education.
Pre-departure checklist
Use this as a literal walkthrough before day one and again each morning of a multi-day trip.
[ ] Two-week rule applied; unused items removed
[ ] Valuables, documents, and seasonal gear out of the car
[ ] Every item has an assigned zone
[ ] Dashboard clear
[ ] Driver's footwell completely unobstructed
[ ] Heavy gear packed low and forward in the trunk
[ ] Nothing stacked above the rear seatback line
[ ] Roof rack load measured and straps checked
[ ] Tire pressure set for load weight
[ ] Emergency kit (first-aid, flashlight, jumper cables) in a sealable bin in the trunk
[ ] Trash bag in place and accessible
Road trip car storage ideas: staying organized while driving
The trunk packs perfectly on day one. By mile 300, the cabin is a different story. These habits keep clutter from rebuilding in transit.
Step 4: Set up a contained snack and essentials station before you leave.
Reaching or turning around while driving to grab items is, in Road Safety Education's words, "incredibly dangerous." Set it up before you leave: a small, closeable container within easy reach of the driver and front passenger, stocked with water, road-safe snacks, and napkins. No open bags. No loose wrappers. Essentials within arm's reach; everything else in a zone.
Step 5: Keep the driver's footwell and dashboard completely clear, always.
This is the non-negotiable. Loose items that migrate to the floor can slide under the brake or gas pedal. AAA specifically names phones, garage-door openers, and sunglasses as items that can interfere with pedals if not stowed in the center console. Loose items are distracting and can prevent pedals from working properly. The dashboard rule applies throughout the drive, not just at departure.
Step 6: Maintain a dedicated trash bag and empty it at every gas stop.
AAA recommends keeping a trash bag in the car and clearing it every time you fill the tank. Road Safety Education includes a rubbish bag as standard road-trip kit. Hang one from a headrest hook or tuck it into a door pocket. On longer trips with multiple passengers, one bag per row keeps the system from breaking down before the first rest stop. The fuel-stop rule is what makes this automatic rather than aspirational.
Step 7: Use a "one item out, one item back" rule for rear passengers.
Tablets, books, and small items come out one at a time. Everything goes back to its designated seatback pocket before the next item comes out. This is house-rule advice, not sourced safety guidance, but it works: the floor stays clear, pileups don't form around kids' seats, and the system passengers agreed to at departure survives past the first hour. The mechanism is the same regardless of whether you're managing a seven-year-old or an adult who can't put their book down.
Step 8: Choose storage accessories carefully, and run a visibility test before using any of them.
If an organizer mounts rigidly near a passenger's head, blocks any part of the rear view, or doesn't carry a stated and tested weight limit, skip it. Soft seatback pocket organizers that sit flat against the seat are the lowest-risk option. Any product attached to headrests that extends into the cabin adds an object near passengers during a potential side or rear impact, a concern raised directly by commenters on a widely shared backseat organizer. One commenter put it plainly: "Love to have this impaling my children if we get into an accident."
The visibility test is simple: sit in the driver's seat and confirm clear sightlines through the front windscreen, rear windscreen, and all mirrors. Road Safety Education is direct about how poor visibility contributes to road trauma. If anything has changed after loading, repack before moving.
Steps 9–11: the rest-stop reset and arrival routine
Every stop is a chance to reset the system. Skipping it is how day-one organization becomes day-three chaos.
Step 9: Run a cabin reset at every rest stop.
Empty the trash bag. Return any items that have migrated from their zones back to their designated locations. Confirm the driver's footwell is clear: no shoes, no water bottles, nothing that can roll under a pedal. This is the maintenance pass, not the setup. The point is doing it at every stop without deciding it can wait until the next one.
Step 10: Check roof rack straps and external cargo while you're stopped.
Vibration, heat, and load shift loosen fastenings over long drives. Road Safety Education explicitly recommends inspecting all straps, ropes, and hooks at every rest stop, not just at departure. A loose load on a roof rack is a hazard to every vehicle behind you. Make it part of the same stop as the cabin check.
Step 11: Unload completely and systematically on arrival.
Start with the trunk, work top to bottom, and take everything that belongs indoors. Don't leave the car half-unloaded overnight with loose items inside. Heat, humidity, and a rushed morning departure will undo three days of discipline in ten minutes. On multi-night trips, run the pre-departure checklist each morning before reloading.
How to organize your car for a road trip: carrying the system forward
The organizing logic is consistent across all 11 steps: every item has a fixed zone, trash exits at every fuel stop, heavy gear stays low and forward in the trunk, and nothing sits above the rear seatback line or on the driver's floor. That's not an aesthetic preference. NHTSA data from 2019 reportedly showed unsecured objects were involved in 8,567 vehicle crashes, resulting in 1,835 injuries and 63 fatalities. The habits here address that directly.
No product eliminates the need for assigned zones, clear floors, and a trash routine. Accessories can support the system but can't replace it, and some make visibility and crash safety worse, not better.
The next gas stop is where this system either holds or falls apart. Not the next organizer purchase, not a better packing cube, just the habit of emptying the bag, checking the footwell, and returning things to their zones. Do that consistently, and the car that arrives at the destination looks a lot like the one that left.

















Comments
Be the first, drop a comment!